This tutorial is about creating better checkboxes & radio buttons using the Contact Form 7 Tag Editor. To learn about doing this in the CF7 Skins Visual Editor, see Better Contact Form 7 Checkboxes & Radio Buttons (with CF7 Skins Visual Editor)
.
Checkboxes and radio buttons are commonly used on many types of forms and you’ll most likely find yourself using them. Make better Contact Form 7 checkboxes and radio buttons by understanding how to use them and the different types of modifications available.
Even though checkboxes and radio buttons are common, they are frequently used incorrectly. Your forms will be easier to understand and use if you follow the rules for checkboxes and radio buttons.

Checkboxes vs. radio buttons
When should I use checkboxes?
Checkboxes are used when you have a list of options and the user can select multiple choices. An important thing to note is checking one box doesn’t uncheck other boxes. An example of this could be a list of dates a person is available and they can check all that apply.
One exception to this rule is when it is a stand-alone single checkbox. For example, a user could check the box if they want to subscribe to a newsletter.
When should I use radio buttons?
Radio buttons are used when there is a list of two or more options and the user must select exactly one choice. Radio button options are mutually exclusive which means clicking a radio button will unselect any previously clicked radio button.
Because one radio button must be clicked, it’s a good idea to ensure that one is selected by default.
Creating and modifying checkboxes and radio buttons
Creating a checkbox
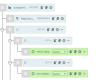
In the Generate Tags section, click Checkboxes. This will pop open a section where you can create your form tagForm Tag Form Tags in Contact Form 7 (CF7) (in the Form Tab) are used to define all CF7 form fields. Each Form Tag is replaced with an HTML element, which represents an input field, when it is displayed in an actual form..

Click Generate Tag then Checkboxes
Once you enter in the choices, you can copy and paste the code into your form. For example, if you are creating a form for Spa services to choose from, your checkbox form tag might look like this:

You now have a checkbox list of three items, which all 1, 2, 3 or all 4 can be selected at the same time.

Creating a basic radio button
To create a radio button, select Radio Buttons from the Generate Tag drop down. Once you enter the list of options, copy and paste the tag into your form. The generate section for your radio buttons would look like this:

Remember that with radio buttons, you can only select one of the options in your list.
After generating checkboxes and radio button, be sure to put them inside li tags when you copy and paste them into the Form section. Our example now looks like this:

Form section with checkbox and radio buttons
Other modifications for your checkbox and radio button
Default selections
When you have your list of checkboxes or radio buttons, you might want to pre-select one of the options.
Going back to the Spa Services checkbox list example, let’s say you wanted the first item, Pedicure, to be pre-checked on your checkbox list. In your tag
[checkbox checkbox-59 "Pedicure" "Manicure" "Facial" "Hot Stone Massage"]
you can add a special tag ‘default:1’ (don’t forget the : ). The complete line now looks like:
[checkbox checkbox-59 default:1 "Pedicure" "Manicure" "Facial" "Hot Stone Massage"]
The number 1 here indicates that the first item in your list, Pedicure, as the default selection. If you wanted the second item in your list, the tag would be default:2 .
For radio buttons, it is the same. If you wanted the default to be 2 guests, the complete tag would be:
[radio radio-175 default: 2 "1" "2" "3" "4 or more"]
Label First
By default for checkboxes and radio buttons, they will appear like this:

If you wanted to change it so that the label is first and checkbox or button second, you can do this using the ‘label_first’ tag:
[checkbox checkbox-59 label_first "Pedicure" "Manicure" "Facial" "Hot Stone Massage"]
will look like:

See also http://contactform7.com/custom-layout-for-checkboxes-and-radio-buttons/
‘Other’ text box (additional information)
If you want to leave an open text option available on your checkbox or radio button list, you can do this using the ‘free_text’ tag and adding in an extra option for your user to check, then type in their response. For example:
[checkbox checkbox-59 free_text "Pedicure" "Manicure" "Facial" "Hot Stone Massage" "Other"]
will include the option ‘Other’ with a checkbox and a box underneath that can be typed in.

Making checkboxes exclusive
Although it does not follow W3C Web standards, there is the option to make checkboxes exclusive. Normally for checkboxes, you can check as many of the boxes as you like. If for some reason, you want only one option to be checked on a checkbox list, you can add an ‘exclusive’ tag:
[checkbox checkbox-59 exclusive "Pedicure" "Manicure" "Facial" "Hot Stone Massage"]
Adding this exclusive tag means a user would only be able to select Pedicure OR Manicure etc as their singular choice.
Ensuring your form is easy to understand
Even though Contact Form 7 offers these options, when creating your checkbox or radio button, the most important things to pay attention to are your labels. The biggest problems with forms are often that labels are vague, misleading, or describe options that are difficult to understand. If your checkbox list or radio button list is easy to read and understand, then your form will be successful.
Further Reading

Contact Form 7 Troubleshooter
If you would like some help from our support staff & are willing to help us by providing information on your use of Contact Form 7 & CF7 Skins, you should complete the following form.
This form is made with CF7 Skins + CF7 Skins Pro + CF7 Skins Ready + CF7 Skins Multi + CF7 Skins Logic
This article is about creating better checkboxes & radio buttons using the Contact Form 7 Tag Editor.
To learn about creating better checkboxes & radio buttons in the CF7 Skins Visual Editor, see Better Contact Form 7 Checkboxes & Radio Buttons (with CF7 Skins Visual Editor).