Contact Form 7 (CF7) sends you an email every time a user submits the corresponding form. However, you cannot dynamically change the content of the email based on the data submitted by the user.
To address this problem, you can use CF7 Skins Logic to add conditional logic in the emails sent by CF7 & change the content of the email based on the information provided by the user.
In this article, we show you how to use CF7 Skins Logic to create conditional logic in the emails sent by Contact Form 7.
Before you begin
But before we get started, there are a few things you need to know:

Adding conditional logic to email
To add conditional logic to your CF7 email, you need to:
- Add conditional logic to the form
- Based on the input of the users, only display the values that need to be sent in the email
- Hide all the values that should not send in the email using CF7 Skins Logic.
For the purposes of this article, let us start with the following contact form.
This form is made with CF7 Skins using the CF7 Skins Caspar styleStyle When you select a CF7 Skins Style the aesthetic design (CSS code) is automatically created and applied to your form..
In this example, we want to ask the users for their subscription plan and show it in the email only if the topic of their query is Billing and Payments. Otherwise, the subscription plan should be hidden.
1. Add conditional logic to show and hide fields in the form
To add conditional logic to show the subscription plan when the topic is Billing and Payments:
1. Install CF7 Skins Logic & activate it.
2. Go to your contact form.
3. Select the logic tab.

4. To add logic to the subscription plan, select your-subscription-plan and click Add Field.

The desired field has now been added. Now, we need to display the subscription plan checkboxes only if the topic is Billing and Payments.

2. Only display the values that need to be sent in the email
To display the values that need to be sent in the email:
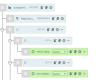
1. Under your-subscription-plan, select Show this if all the following statements are met.

2. In the next line, select your-topic = Billing and Payments.
3. Save the form.
Tip: Follow the instructions in How to use CF7 Skins Logic to show and hide a checkbox for details on adding conditional logic to your form.
3. Hide all the values that should not send in the email
You can use the same method to hide the values that should not be sent in the email. Instead of Show this, you can use Hide this to hide the fields based on the user input.
In this case, the form now becomes:
Instructions – Choose Billing & Payments in the topic dropdown to show the hidden subscription question.
Tip: You can add multiple criteria to hide or display the form fields based on the user input. Go to CF7 Skins Logic Demo for details.

Configuring the Email
Next, you need to configure the email to send only those values that have been provided by the users through the form. To do this,
4. Configure the email
Go to your Contact >> Contact Form >> Form and select the Mail tab. Then, provide the following details in the tab.
1. To: The email address where you want to send the email.
2. From: The email address the email is sent from.
Tip: Use a suitable From address to avoid being flagged as spam.
3. Subject: Subject that will appear at the top of the email.
4. Additional headers: Additional headers such as Reply-to, Cc, and Bcc.
5. File attachments: The files to be attached to the email.

Tip: For details on filling out the email fields, refer to Beginners guide to setting up mail.
5. Add the message body
You can now compose the email using all the submitted form data with the help of the corresponding mail tags of the input fields of the form.
1. Scroll down to Message Body and create the email including each form field.
2. Add each form field in the way you want this info to appear when the user is shown & then completes this field.
- From: [your-name] <[your-email]>
- Topic: [your-topic]
- Subscription Plan: [your-subscription-plan]
- How can we help: [your-query]

There might be multiple fields in your form that may be hidden, based on the user input and your CF7 Skins Logic conditions. You must add such fields in individual separate lines in the message body.
Tip: Make sure you match the mail tags with the form tags in the message body.

6. Exclude lines with blank mail-tags from output
All the fields that are hidden in the form should contain empty values.
Therefore, you can now use the Exclude lines with blank mail-tags from output feature of Contact Form 7 to hide the corresponding line from the final email.

Now, in our example, if the user has selected the Billing and Payments topic, you will receive the following email.

If the user has not selected Billing and Payments, you will receive the following email.

In the example above, the line containing Subscription plan: [your-subscription-plan] is hidden in the email if the selected topic is anything other than Billing and Payments.
Further reading
- CF7 Skins Logic – Demo
- Beginner’s guide to setting up mail in Contact Form 7
- Show and Hide a Checkbox on your Form

Contact Form 7 Troubleshooter
If you would like some help from our support staff & are willing to help us by providing information on your use of Contact Form 7 & CF7 Skins, you should complete the following form.
This form is made with CF7 Skins + CF7 Skins Pro + CF7 Skins Ready + CF7 Skins Multi + CF7 Skins Logic
Have questions or need help?
If you are using the free version of CF7 Skins, you can get help via the CF7 Skins community and also the Contact Form 7 Support forum.
If you are using any of our Add-ons, we provide Premium Email Support to help with your questions and problems.