Contact Form 7 (CF7) is popular among millions of the WordPress (WP) users. However, for beginner users, getting used to CF7 can be challenging.
A common mistake beginners make is not adding Mail Tags which match with their Form Tags.
In this article, we explain how to match mail tagsMail Tag Mail Tags are used in Contact Form 7 (CF7) (in the Mail Tab) to show information collected from CF7 form fields (in the Form Tab) in emails sent by CF7. with form tagsForm Tag Form Tags in Contact Form 7 (CF7) (in the Form Tab) are used to define all CF7 form fields. Each Form Tag is replaced with an HTML element, which represents an input field, when it is displayed in an actual form. so you receive all the information submitted from your Contact Form 7 forms.
Form Tags
In Contact Form 7, there are different Form Tags available to create a form. These tags are code snippets that represent form fields. You add these Form Tags in the Form tab.

Tip: You can use the free version on CF7 Skins to add all available CF7 Form Tags quickly & easily using the CF7 Skins Drag & Drop Visual Editor.

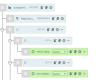
The Form Tags in the image above are:
[text*your-name][email* your-email][textyour-subject][textarea your-message]
Tip: To learn about the different sections of a Form tagForm Tag Form Tags in Contact Form 7 (CF7) (in the Form Tab) are used to define all CF7 form fields. Each Form Tag is replaced with an HTML element, which represents an input field, when it is displayed in an actual form., refer to How Tags Work.
Mail Tags
Contact Form 7 uses Mail Tags which match each Form tag. You add these Mail Tags in the Mail tab.
| Form Tags | Mail Tags |
|---|---|
| [text* your-name] | [your-name] |
| [email* your-email] | [your-email] |
| [text. your-subject] | [your-subject] |
| [textarea your-message] | [your-message] |
To help you prepare your CF7 emails, the available Mail Tags are shown at the top of the Mail tab.

You add these Mail Tags wherever you want to show the information provided by the form user. You can combine the Mail Tags with explanatory text to create a useful email.

The Mail Tags in the image above are:
[your-name][your-email][your-subject][your-message]

Matching Mail Tags with Form Tags
You can match your Mail Tags with your Form Tags by following these steps:
1. Go to the Mail Tab
You can find all the available Mail tags listed at the top of the Mail Tab.
Any tags you have not used in the Mail Tab are marked bold.

Tip: You need to add the Mail Tags which match with the relevant Form Tags for each form field response you want to appear in your email.
2. Complete the Email Header Section
Add the Mail Tags which you want to use as part of your Email Header in this section.

Do this just as you would with any email that you send from your computer. Use the Mail Tags to customize the email to the form user.
Further Reading:
3. Add the form information to the Message Body
Finally here you can combine the remaining Mail Tags with explanatory text to create a useful email.

Tip: Use CF7 Special Mail Tags to include in the email information on where the form was submitted.
Further Reading:
- 5 common mistakes beginners make when they start using Contact Form 7
- Beginner’s guide to setting up mail in Contact Form 7
- Some From: email addresses to NOT use

Contact Form 7 Troubleshooter
If you would like some help from our support staff & are willing to help us by providing information on your use of Contact Form 7 & CF7 Skins, you should complete the following form:
This form is made with CF7 Skins + CF7 Skins Pro + CF7 Skins Ready + CF7 Skins Multi + CF7 Skins Logic