CF7 Skins lets you easily create a range of stylish and creative Contact Form 7 forms with its helpful features. However, you may still face the problem of abandoned forms. To improve form completion rates, you can create conversational forms using CF7 Skins add-ons.
Conversational forms show only a few fields at a time, making the form filling process feel like an actual conversation. This has shown to improve user experience and rate of response.
In this article, we show you multiple ways of creating conversational forms using CF7 Skins and its add-ons.
Benefits of conversational forms
Conversational forms are:
- Simple – Display one or a few selected questions at a time
- Responsive – Ask further questions based on previous responses
- Easy – Help fill the form quickly and easily
Try it yourself
In the example below, you can see a conversational form in action:
Creating conversational forms
You can create conversational forms using two different methods:
- Conditional forms to show/hide form elements based on previous input
- Multi-page forms to divide the form into multiple pages

1. Conditional forms
You can modify your forms with CF7 Skins Logic to add conditions so that a field is displayed only after filling out the previous field. This way, users can focus on one field at a time.
Tip: You can add the Paragraph field using CF7 Skins Visual Editor to add a conversational message where needed.
We will go through the creation process of the above form to get a good understanding of how conditional conversational forms can be created. To create a conversational conditional form:
1. Create a new form and add all the required fields to it.
2. Using the visual editor, make sure you drag-and-drop a Paragraph field to add conversational messages inside the LIST-LI component for some of the fields.

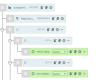
3. Now, we must configure the form to display the Email Address field only after the user has provided their Full Name. To do this, go to the Logic tab.
4. Select the field name from the drop-down list to add conditional logic to and click Add Field. In this case, we select email.

5. Choose the previous field from the drop-down. In this case, we select full-name.
6. Select the != condition and leave the other field blank.

Tip: In the above example, the email field is displayed only when the user has entered their Full Name.
7. Similarly, add logic for all the succeeding fields with the condition previous field != <blank>.

Tip: To make multiple fields appear at the same time, make sure you add the same logical statement for all those fields. This is shown with the phone and select-issue-type fields in the above image.
8. Click Save.
You have now created a nice interactive conversational form.
Tip: For details on using CF7 Skins Logic, refer to CF7 Skins Logic – Conditional Logic
2. Multi-page forms
You can modify your forms with CF7 Skins Multi to break your form into multiple tabs or pages. This way, users only have to focus on one group of fields at a time.
We will go through the creation process of a form similar to the above form in a multi-page format.
Tip: Make sure you decide beforehand which fields are grouped into which page.
To create a conversational multi-page form:
1. Create a new form and add all the fields planned to be included on the first page of the form.
2. Double-click Tab 1 to rename it. In this case, we change it to Personal Information.

3. Click the add icon (+) to add a new tab and provide a name. In this case, we name it Issues.

4. Add the relevant fields to the new tab.
5. Similarly, create as many tabs and fields as you require.

6. You can also add navigation buttons, a progress bar, and pagination from Form Options in the Visual Editor.
7. Click Save Visual to save your form.
You have now created a convenient multi-page conversational form.
Tip: For details on using CF7 Skins Multi, refer to CF7 Skins Multi (with Visual Editor)
You can also combine these two methods to create your own multi-page conditional conversational forms.
![]()
Provides a complete solution for your Contact Form 7 forms
Further Reading