While designing a Contact Form 7 (CF7) form using CF7 Skins, it is recommended to group the form into fieldsets with their respective legends.
Use of fieldsets in a form helps you divide the inputs into logical groups. Apart from being a good form design principle, it also helps the users fill out the form easily.
This article will show you how to logically group the input fields using fieldsets and how they can improve the usability of Contact Form 7 forms.

Before you begin
But before we get started, there are a few things you need to know:
- How to set-up a Contact Form 7 form and style it with CF7 Skins
- Using fieldsets in your forms
- Why to use fieldsets, legends, and lists
Sample form
For the purposes of this article, let us use a sample form for registration to a convention. The form is going to take the following inputs.
- Name
- Phone number
- Email address
- Whether the person wants to opt-in for meal plans
- Whether the person will be attending additional workshops
- Any comments or questions
Initially, when you use Contact Form 7 without CF7 Skins, the form looks similar to this:
Tip: The actual appearance of this form is set by our current WordPress theme & the CSS styling that theme applies to standard HTMl form elements (in general) & Contact Form 7 forms (in particular).
Problems
This form has a couple of major problems, which are:
- It has no borders to markedly separate it from the rest of the content in the page.
- There is no distinct grouping of the fields in the form.
Due to these problems, filling out the form can be confusing and jarring to the users. Additionally, the form does not conform to good form design principles. To improve it, we make the following changes.

Using borders to enclose the form
Use of borders separates the form from the rest of the content in the website. This distinctly marks the boundaries of the form and removes a considerable amount of confusion for the users.
Select CF7 Skins StyleStyle When you select a CF7 Skins Style the aesthetic design (CSS code) is automatically created and applied to your form.
To select a CF7 Skins Style:
1. Select your form from Contact >> Contact Forms.
2. Scroll down to the CF7 Skins Visual Editor.
3. Go to the Style tab.

Styles Tab of CF7 Skins
4. Select the desired style – in this case, Caspar.
5. Select the Form tab and click Save Visual.
The initial form now looks like this:
.
As you can see, using borders has made it clear that the last line, Thank you for using our website to register is actually part of the form. The modified form is also easy on the eyes.

Logical grouping into fieldsets
In the sample form, it seems that the best way to logically group the forms is as follows:
- Personal Information
- Name
- Phone number
- Email address
- Plan Details
- Opt-in for meals
- Additional workshops
- Comments or questions
Add Fieldset using CF7 Skins
Follow the steps below to add fieldsets to your form:
1. Select your form from Contact >> Contact Forms.
2. Scroll down to the CF7 Skins Visual Editor.
3. Add new fieldset from the FIELDS (CF7 SKINS ITEMS) section.


6. Click Save Visual.

Fieldset Edit Dialog
Tip: Since all the inputs are in a single fieldset initially, you can just duplicate the fieldset by clicking the Duplicate icon, edit the respective legends, and remove unnecessary input fields from each fieldset.
After logically grouping the form, it looks like this:

.
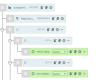
The CF7 Skins Form tab of the form now looks like this:

Use of fieldsets in the Sample Form
The final form eliminates the problems of the original form. It also looks to be well-designed, removes confusion among the users filling out the form, and is easy on the eyes.