You can make your Contact Form 7 (CF7) forms more readable & easy to use by adding helpful text labels on each form field.
Adding suitable text labels in your forms offers the following advantages:
- They help form users understand your form and let them know what is required in each field
- Clicking on the text within the label tags automatically highlights the respective form field
- Label tags are also extremely useful for screen readers as well.

Adding text labels using the CF7 Skins Visual Editor
To add a text label for a field using the CF7 Skins Visual Editor follow these steps:
1. Go to your Contact >> Contact Forms >> Form.
2. Scroll down to the Skins section.

3. Drag and drop the desired field from the FIELDS (CF7 TAGS) section.

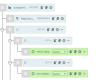
4. Click the Edit icon of the field where you want to add the label.
![]()
5. Enter the desired Label and click Done.

Tip: You can click Done to close the Edit dialog box if you want, but you don’t need to do this – your changes are updated in the CF7 Skins Visual Form tab as you type.

6. Update all the fields with the necessary text labels.
7. Click Save Visual.
The text labels are now displayed in the form as shown below:

![]()
Provides a complete solution for your Contact Form 7 forms
Further reading
- How to use the CF7 Skins Visual Editor
- Add Better CF7 Placeholders
- CF7 Documentation – Adding text-labels to input fields

This article is about adding text labels using the CF7 Skins Visual Editor. To learn about adding text labels using the Contact Form 7 form editor, see Adding text labels in your Contact Form 7 forms (with CF7 Editor).